Advanced Workflow Tips
Outline
Creating Personal Workflow Templates
Usually, Workflows will follow Organizational Workflow Templates that have been created by application administrators, which define how commonly-used processes flow. However, you as a regular user can also create Personal Workflow Templates to define processes that you follow on your own, to help you track your own work within the system.
- In the top-right of the application, click Templates > Workflow Templates.
The Workflow Templates screen appears.

- Click the Personal tab.
- Click Add Personal.
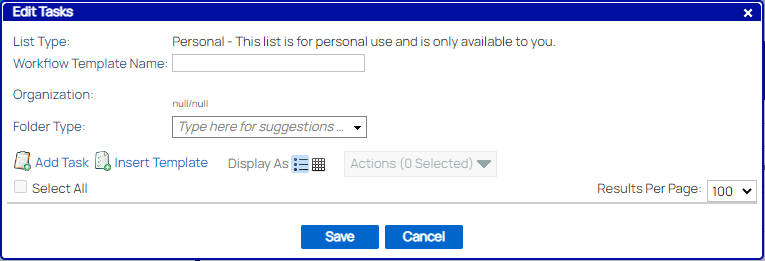
The Edit Tasks window appears.

- Enter information in the required fields.
For detailed information on adding a task to the workflow template using the Add Task link on this screen, refer to Creating Tasks for Workflows. - Optional: In the Edit Tasks window again, click Insert Template.
The Select Template window appears. - Optional: Select an existing template or create a new one, and then click Select.
The Edit Tasks window appears with the template added. - Click Save.
The workflow template appears on the Workflow Templates screen.
Creating Tasks for Workflows
Want to learn how to create organizational workflows that your entire team can use? Visit the Process Administrator tasks under the Administrator section. Additionally, if a process administrator gave your Create On-Demand privileges, see Creating Folders to create On-Demand organizational workflows.
If you are a process administrator, you can also set up tasks by navigating to (a) Administration menu > Folder Configuration > Add New Folder Definition > Initiating Docs tab > Add Initiating Document Settings > Create New Folder checkbox > Manually Setup Folder > Choose Options or (b) Administration menu > Folder Configuration > Add New Folder Definition > Create On Demand tab > Manual Setup Folder > Choose Options. See the Creating Folder Definitions procedure.
- In the top-right of the application, click Templates > Workflow Templates, and then click the Personal or Organizational tab.
The Workflow Templates screen appears.

- Depending on your previous selection, click Add Personal or Add Organizational.
The Edit Tasks window appears.

- Enter information in the required fields:
- Workflow Template Name - Create a unique name for your template.
- Organization - If it’s a personal workflow, the organization is set. If it’s an organizational workflow, select a position from the Organizational Hierarchy window.
- Folder Type - Select a folder type to determine what workflow you want this task to be connected to.
- Click Add Task.
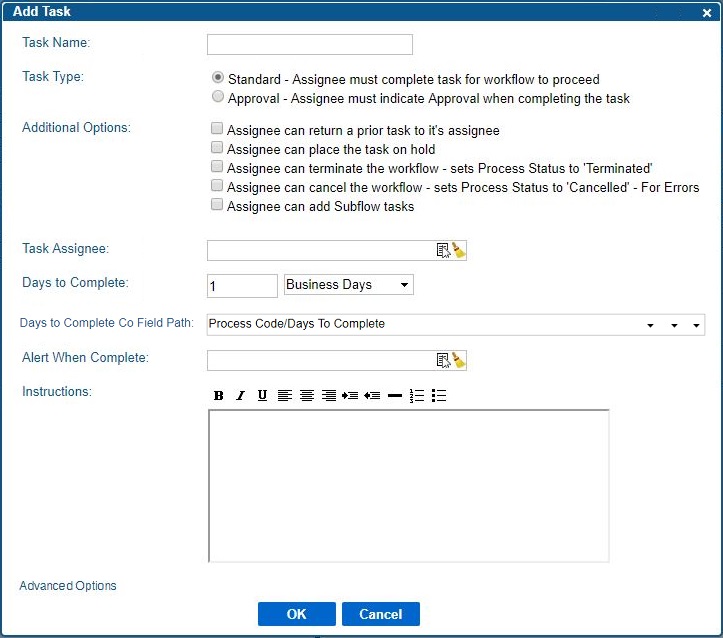
The Add Task window appears.

- Review the options within the Add Task window:
- Task Name - Enter a unique name for your task (ex. Review & Approve).
- Task Type - Select Standard (assignee must complete this task before the workflow moves forward) or Approval (assignee must indicate their approval in order to complete the task). If approval is selected, then a Terminate Workflow When “Not Approved” Selected checkbox appears.
- Additional Options, which includes the following:
- Assignee can return a prior task to it’s assignee checkbox - When selected, two options appear: Return to Group/Position or Return to user who completed the task.
- Assignee can place the task on hold Edit Hold Instructions checkbox - When selected, the user can click Edit Hold Instructions to add written instructions. Also, users can select who the task returns to if the hold expires: the User who placed task on hold or the Assignee Organization.
- Assignee can terminate the workflow - sets Process Status to ‘Terminated’ checkbox.
- Assignee can cancel the workflow - sets Process Status to ‘Cancelled’ - For Errors checkbox.
- Assignee can add Subflow tasks checkbox.
- Task Assignee - Click the Select (
 ) button to view the Select Assignee window. Under the Folder tab, you can choose the person who created the folder, or select a field for Use Folder Field. OR under the Organizational tab, navigate to the correct organization, position, or user. Then click Select to assign this task to only the folder creator, the user, or the position that you specified.
 - Days to Complete - Enter a numeric value, and then choose either Business Days or Calendar Days.
- Days to Complete Co Field Path: If the Days to Complete should vary based on a folder field, indicate that here. This should be a numeric field. Note that you will still need to fill in the Days to Complete so that the system has a default value to use in case of any data anomalies
- Alert When Complete - Click the Select (
 ) button to navigate to the organization, position, or user that must be alerted when the task completes.
 - Instructions - Enter instructions to help users complete this task.
- Click Advanced Options.
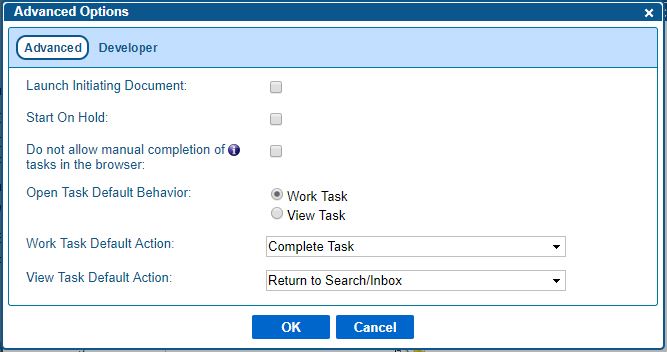
The Advanced Options window appears.

- Review the options in the Advanced Options window:
- Launch Initiating Document - When selected, the task is connected to a document. Therefore, if a document is added to the system that starts the workflow connected to this task, the document automatically downloads when you open up the folder.
- Start On Hold - When selected, whenever this task is launched, it automatically goes on hold. It can be viewed in the assigned user’s Inbox, under the On Hold tab.
- Do not allow manual completion of tasks in browser - When selected, this connects your integrated, third-party system and then this task cannot be completed within ; so the task can only be completed in the third-party user interface.
- Open Task Default Behavior - Select Work Task so that the user sees the following options when a document moves to the task you are creating: Complete Task, Put Task Back into Inbox, and Return to Inbox. OR select View Task so that the user sees the following options when a document moves to the task you are creating: Claim Task and Return to Inbox, Start Working Task, and Return to Inbox.
- Work Task Default Action - This is connected to the Work Task setting selected for Open Task Default Behavior. If Work Task is selected, choose the option that is automatically selected for the end-user. The options include: No Default, Approve, Place Task on Hold, Put Task Back into Group Inbox, or Return to Search/Inbox.
- View Task Default Action -This is connected to the View Task setting selected for Open Task Default Behavior. If View Task is selected, choose the option that is automatically selected for the end-user. The options include: No Default, Claim Task and Return to Search/Inbox, Start Working Task, or Return to Search/Inbox.
- For the Open Task Default Behavior option, select Work Task or View Task.
- Select the necessary criteria for the task options, and click OK.
- When the alert message appears, click Yes.
- In the Add Task window again, select the necessary criteria for the task options, and click OK.
The Edit Tasks window appears with the task added. - In the Edit Tasks window again, click Insert Template.
The Select Template window appears. - Select an existing template or create a new one, and then click Select.
The Edit Tasks window appears with the template added. - Click Save.
The workflow template appears on the Workflow Templates screen.