Process Administrators
The following sections describe the various activities that a process administrator role can perform.
Outline
- Creating Folder Definitions
- Configuring Folder Fields
- Configuring Folders to View Field-Related Documents
- Configuring a Workflow for a Folder
- Configuring Folder Security
Creating Folder Definitions
Folder Definitions link to a workflow and define the index fields that appear for the workflow.
- Click Administration > Workflow Folder Definitions.
The Workflow Folder Definitions screen appears with several search results.

-
Click Add New Workflow Folder Definitions.
The Create Folder Definition window appears.

Note that the options on the left of the screen may vary slightly based on your organization’s QAction setup. In particular, if your organization has Records Management, then you will see a Retention tab in addition to the tabs pictured above. -
Enter a Folder Name and Description. You will want to leave the Status field as Active.
-
In the Owner field, select the organization that handles this process.
-
Keep the default settings for the Application Administrator and Process Administrator.
- Click Save.
You have now created a very basic folder definition in the system. However the folder is not going to be very useful without further configuration. The next important step is Configuring Folder Fields, and you may also want to configure a workflow as well in order to include tasks for users to work within the folder. Improve how the folder and workflow search screens function when the folder type is selected by configuring Priority Search Fields for the folder definition.
Configuring Folder Fields
On the Create/Modify Folder Definition screen, click the Folder Fields tab on the left.
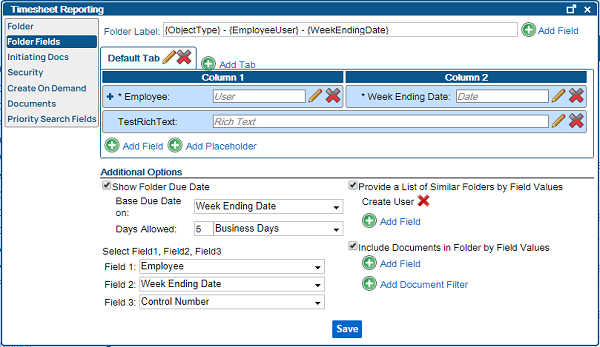
Folder Label
The Folder Label field at the top lets you customize how the system displays the name of the folder that users will click on in search results to open it. The example above shows fields from the folder itself in brackets{}, so the label for each individual folder will vary depending on the values of those fields. Below shows how a folder with this configuration might appear in a search result - the blue text is determined by the Folder Label field.

To select folder fields to include in the label, click Add Field to the right of the Folder Label field. This opens a window where you can look for the fields you want in a drop-down menu.

Tabs
Tabs can be used to organize different folder fields into different sections. All folders have a Default Tab. Additional tabs can be added using the Add Tab link. The names of different tabs can be edited using the edit icon (![]() ) for the tab. Tabs can be deleted using the remove icon (
) for the tab. Tabs can be deleted using the remove icon (![]() ).
).
Click on different tabs to configure the folder fields that display in each one.
Folder Fields
Folder fields give users information and enable users to search for folders by specific data.
When adding or modifying an index field on the folder, you will have the following options:
- Display Name customizes the label of the field that will appear on the folder
- Span Columns makes the field the entire width of the folder instead of sticking to one column.
- Required indicates whether the user must input a value for the field when saving the folder.
- View Mode Mask modifies how the value of the field appears on the folder.
- Validation allows you to input a pattern that the value for the field must match when saving the folder, and a Failure Message to display to the user if the value doesn’t match the pattern.
Custom object fields have a blue Plus (+) button to add related subfields. When adding or editing a subfield, you can choose whether or not to make it editable on the folder.
Drag any of the fields between Column 1 and Column 2 to alter how the fields are organized when a user is viewing the folder.
Additional Options
- Show Folder Due Date checkbox - Selecting a field for the Base Due Date on field, and enter a number of days in the Days allowed field (select either business days or calendar days).
- Select Field 1, Field 2, Field 3 section - Select the three most important fields, and those appear first in a search.
- Include Documents in Folder by Field Values checkbox - Add fields and then those selected fields connect future documents via matching values to this folder. End-users can then open a folder, click the Documents tab, and view documents that were added directly to that individual folder, as well as documents related to that folder according to the fields configured here by the administrator. For more information, refer to Configuring Folders to View Field-Related Documents.
- Provide a List of Similar Folders by Field Values checkbox - Add fields so that users can easily find related folders based on sharing the same values for those fields. Select this checkbox and when the folder is opened by an end-user, a View Similar Folders (
 ) button appears which the user can click to view a list of related folders.
Configuring Folders to View Field-Related Documents
This task must be performed by a process administrator.
Administrators can configure a Folder Definition to automatically pull in documents to a folder based on certain Field Values and Classification/Document Type(s). To view the field-related documents in your folders, refer to the Viewing the Field-Related Documents in Your Folders topic under Workflow Functionality.
- Click Administration > Folder Configuration.
The Search Folder Definition screen appears with several search results. - Locate the folder definition and click the title.
The folder definition window for the selected folder definition appears.

- Click the Folder Fields tab.
- In this window, select the Include Documents in Folder by Field Values checkbox in the bottom-right.
By default this option is not selected. Selecting the checkbox connects documents to the folder by configured field values. - Click Add Field beneath the Include Documents in Folder by Field Values checkbox.
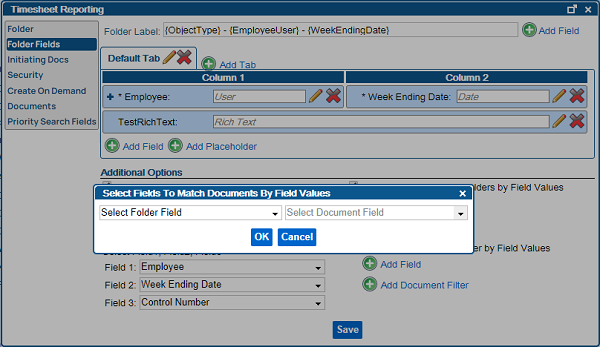
- From the left drop-down list, select a Folder Field.
A folder field must be selected from the left drop-down before the right drop-down is available. Once a folder field is selected, the right drop-down is available to select document fields that match the data type of the folder field selected. For example, if a date field is selected from the (left) folder field drop-down, only date fields appear in the (right) document field drop-down. - From the second drop-down list, select a Document Field.
- Click OK.
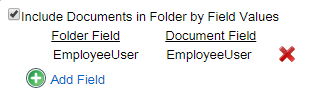
The fields appear under the checkbox.
- Click Add Document Filter.
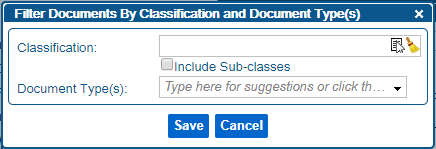
- Select a Classification and optionally one or more Document Types, then click Save.
The selected Classification/Document Type(s) will appear beneath the selected Field Values. - Click Save.
Any folders with the definition you just edited will include documents added directly to the folder on the Documents tab like normal, as well as now including documents of the selected Classification/Document Type(s) where the field on the document matches the field on the folder. - Close the folder definition window.
Configuring a Workflow for a Folder
When creating a folder definition, there are two ways to configure a workflow for the folder:
- Specific documents can be configured to automatically kick off a workflow when they are added to the system. These can be set up on the Initiating Docs tab of the folder definition screen.
- You can allow users to manually kick off a workflow using the Create On Demand tab of the folder screen.
Review how to configure these options in the sections below.
Initiating Documents
- Click the Initiating Docs tab, and click Add Initiating Document Settings.
The Initiating Documents Setting window appears.

- In this window, review the options:
- Classification field - Select or enter a classification. This field and the Document Types field are connected.
- Document Types field - Either select specific document types in the field to limit the options, or click the All Document Types not Configured as Initiating Documents option so that when a document is added under this classification, all of the document types are available. If a document is added to the system with the selected Document Type and Classification, it starts the workflow connected to this folder.
- Allow the following routing options for new documents section - Select one or more of the checkboxes. When a document is added to the system with the same classification and document type configured above, a routing process begins. If two or more of the checkboxes are selected, then the Route window appears immediately after the document is added.
- Create New Folder checkbox - When selected, you must select a workflow template to use (recommended) or manually set up a folder workflow. When a document is routed, it will follow the workflow defined here. If this checkbox is the only one selected, then the document added under this classification launches a task that is automatically routed and appears in your Active Tasks tab in your Inbox (no Route window appears after the document is added).
- Choose Field Values to Copy From Documents to Folder link - Select fields to pull those field values from the document and to automatically add those fields to this folder when a new folder workflow begins (i.e., copy the field values from the document to the folder).
- Add to an Existing Folder checkbox - When selected, click Choose Folder Lookup Fields to choose fields. Select a Document Field and/or Folder Field and click Add Selected > OK. Then when the end-user adds a document to this folder later, the Route window automatically appears. The end-user must choose an existing folder that has field values matching the selected Document Field and/or Folder Field in order to route the document.
- Choose Folder Lookup Fields link - Select fields so that later the user can filter the folders by these fields when prompted on the Route window to choose a folder. The user can view all of the folders with the same field values.
- Auto Route On Folder Found checkbox - If exactly one folder is found with matching folder fields to the document, the system will automatically add the document to that one existing folder. If multiple folders are found, then the user will receive a Route Document task as normal. If no folders are found at all and the Create New Folder option is checked, then the system will automatically create a new folder.
- Add to Repository Only checkbox - When selected, the document is added to the system without launching a workflow. If this checkbox is the only one selected, then the document added under this classification is automatically added to the system (no Route window appears after the document is added).
- Create New Folder checkbox - When selected, you must select a workflow template to use (recommended) or manually set up a folder workflow. When a document is routed, it will follow the workflow defined here. If this checkbox is the only one selected, then the document added under this classification launches a task that is automatically routed and appears in your Active Tasks tab in your Inbox (no Route window appears after the document is added).
- When more then one option is available to route an incoming document, who determines the appropriate route? section - In the first field, select an organization, position, or user. This selection is assigned the Route Document task if the document must be routed. Alternately, you can leave it blank with the The person filing the document (Indexing, Add Electronic Document, Create Bar Code) option selected, so that the person adding the document automatically decides how it is routed.
- Allow Backfiling of Documents without Initiating Workflow checkbox - When selected and an end user adds a document, the Back File checkbox appears on the Add Document window. Then the end user can skip the Route window, and the document is automatically added to the repository only, regardless of what is selected in the Routing Options above.
- Select values for the fields, and click Save.
The Initiating Documents Settings window closes. The document settings are added to the Initiating Documents tab.
Create on Demand
- Click the Create On Demand tab.
If users, roles, or organizations are given Create Folder privileges on the Security tab, then on the Create On Demand tab, you must define what workflow is initiated when those users create an on-demand folder.

- For the Workflow Options, select a workflow template to use (recommended) or manually set up a folder workflow.
- Click Save.
The window closes and the folder is created.
Configuring Folder Security
- Click the Security tab.

- Review the existing user roles listed and their privileges.
- Click Add New ACL Entry to add a new user, role, or organization to specify unique privileges.
- Review the privileges for each of the columns:
- View Folder - Users can find and view folders.
- Edit Folder - Users can edit any folder field.
- Delete Folder - Users can delete folders from the system.
- Create Folder - Users can create new folders on demand (without an initiating document).
Users with this privilege can create workflows with the Creating Folders procedure. - Edit Workflow - Users can edit the workflow tasks to be completed for existing folders.
- Edit Security - Users can edit the security privileges for existing folders.
- Deactivate/Reactivate - Users can deactivate and reactivate the workflow for existing folders.