Business Objects
The following sections describe the various activities that a application administrator role can perform.
Outline
- Overview
- Adding Fields to a Custom Object
- Preventing Duplicates of Field Values
- Modifying Labels for Custom Objects
- Configuring Custom Object Security Settings
Overview
A business object, also called a custom object, is multiple fields associated with information about a person, place, or thing. This static content is viewed by end users, but administrators can create or modify a custom object’s configuration on the Business Objects screen.
Use this screen to do the following:
- Create or modify a custom object.
- Modify or delete fields from custom objects.
- Customize labels and icons for fields.
- Update security for certain groups or user roles for custom objects.
- Export object definitions in a PDF or an Excel sheet.
To open this screen, click Administration > Business Objects.
The Business Objects screen appears.

To create a new object definition, click Add. To modify an existing definition, select one from the grid and then click Modify.
The Add or Modify Object Definition window appears.

- The Display Name is the name that users will know the object by in the system.
- The Custom Search Placeholder sets the text that will display in the top search bar on the search screen for the object.
- The System Name is just how the object is saved in the database. When you first create the object, the system will automatically create a System Name based on the Display Name.
- The Id is also automatically generated by the system and is just used to identify the object in the database.
- The Has Notes & Activities checkbox adds a tab to the object in the application where users can view related notes and documents.
- The Top Level checkbox adds the object to the left-hand menu to allow users to search for it in the system.
The rest of the screen is organized into tabs, which you can learn more about by clicking the links below.
- Use the Fields tab to add and modify index fields on the object.
-
Default Security tab - Organizations and their subgroups appear. When an end-user adds an entry to the application using a custom object field, you can grant permissions to user groups so that the end-user can view, add, edit, or delete individual instances of custom object entries. Other organizations or users can be added in order to determine who has permissions to adjust these objects.
-
Security by Type tab - The Type Field drop-down list appears so that you can apply unique security settings for specific field types.
-
Use the Disposition tab to configure record policies for the object
- The Priority Search Fields tab lets you define which fields the system should use for the top search bar on custom object search screens as well as suggestions when users are typing in values for a custom object field.
Adding Fields to a Custom Object
-
Click Administration > Custom Objects.
The Object Definitions screen appears. -
Select an existing object and click Modify.
The Modify Object Definition window appears. -
Under the Fields tab, click Add Field.
The Add Custom Objects Field window appears.
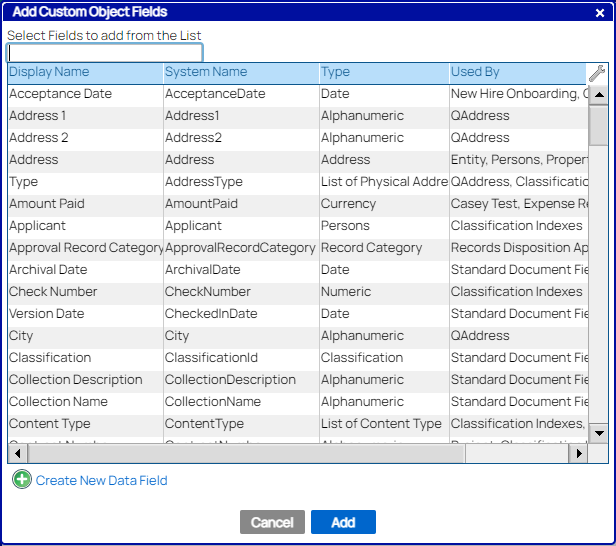
This screen shows existing index fields in the system, which can be re-used. -
To create a new index field, click Create New Data Field.
The Add Field window appears.
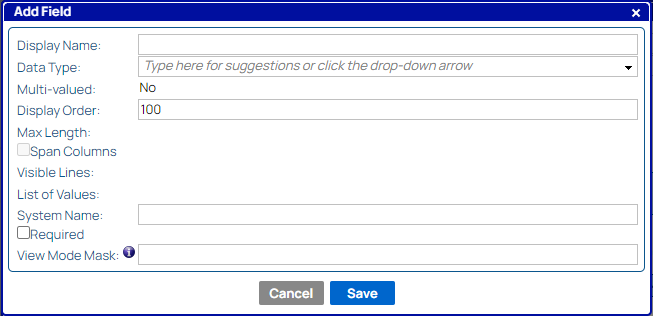
-
Enter values in each field, and click Save.
The new field appears in the Add Custom Object Fields window. -
Make sure the new index field is selected, and click Add.
The new index field now appears on the Fields tab on the custom object. -
To save your changes, click Save.
The window closes, and the custom object is saved.
Preventing Duplicates of Field Values
To prevent duplicates of field values, customize the key fields in a custom object.
-
Click Administration > Custom Objects.
The Object Definitions screen appears. -
Select an existing object and click Modify.
The Modify Object Definition window appears.
-
Under the Fields tab, click Modify Key Fields.
The Manage Key Fields window appears.

-
Click Add Group.
The Add Folder Fields window appears. -
Select one field that you want the system to prevent a user from adding a duplicate of (ex. SSN).
-
Click Add.
The field appears in the Manage Key Fields window with Prevent Duplicates selected below it.

-
To add another separate field that cannot have duplicates, click Add Group, select another field, and click Add.
-
To stop the system from adding duplicates of a combination of fields, click Add Key Fields under an existing group.
The Add Folder Fields window appears. -
Select another field, and click Add.

The system prevents a user from adding duplicates of the combination of field values. -
Click Save.
When users add information to the system using this custom object, the system prevents the user from adding a duplicate entry of a Create Date value, and duplicate entries of both SSN and Company values in combination.
If the fields Company and SSN are in the same Key Fields Group, and only one of the field values that a user enters matches a field value already in the system, then the system allows the user to add it. However, if the two values for the two fields have a matching combination of values already in the system, then the system does not allow the user to add a duplicate with these same values.
If a custom object has two Key Field Groups, then those values are separate from each other. If one of the values for a field has a matching value already in the system, then the system does not allow the user to add a duplicate with that same values.
Modifying Labels for Custom Objects
Modifying a label helps identify search results faster. Labels correspond with how an item appears in search results.
-
Click Administration > Custom Objects.
The Object Definitions screen appears. -
Select an existing object and click Modify.
The Modify Object Definition window appears.
-
Under the Fields tab, click Modify Label.
The Modify [Custom Object Name] Label window appears.
![Modify [Custom Object Name] Label Window](/assets/images/modify-label-window.png "Modify [Custom Object Name] Label Window")
-
In the Text Template field, field name placeholders appear (ex. {Address1}).
-
Click Add Field.
The Add Field to Label window appears with a drop-down list containing fields on the custom object. -
From the drop-down list, select a field, and click Add.
The field name placeholder appears in the Text Template field in the Modify Label window. -
You can also enter plain text to the field, such as punctuation to help format the label well.
-
Click Save.
-
In the Modify Object Definition window, click Save.
The label has been updated and saved for the custom object. -
To see the label changes applied, perform a search for the custom object.
Configuring Custom Object Security Settings
There are two ways to configure security settings for a custom object.
- The Default Security tab lets you set a default security configuration for the custom object. This is likely what you will want to do for most custom objects.
- The Security by Type tab lets you set custom security configurations for the custom object depending on the value of a particular field on the custom object. This can only be done for custom objects with a List of Values field.
Follow the steps below to configure security on a custom object.
-
Click Administration > Custom Objects.
The Object Definitions screen appears. -
Select an existing object and click Modify. Note that to set security by type, the object must have a List of Values index field on it.
The Modify Object Definition window appears.
-
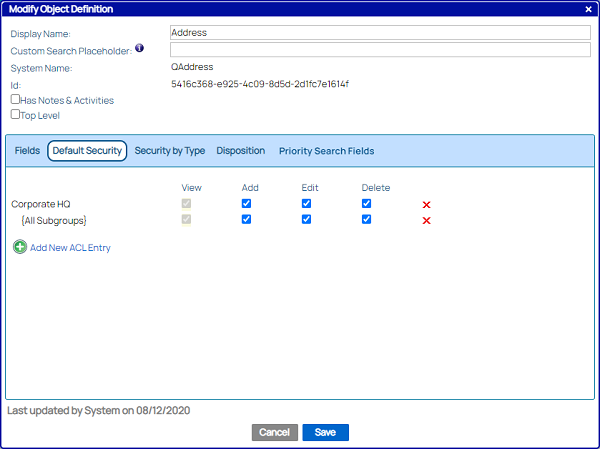
To configure default security for the custom object, click the Default Security tab.
-
Add new groups or users to the screen by clicking Add New ACL Entry.
This opens the Select for Access Control List pop-up.
Locate the desired group or user and click Select. -
Click on the relevant checkboxes to modify security settings for any groups or users on the screen, or click the Remove Icon(
 ) next to any groups or users that do not need their own unique privileges on the custom object.
 -
To set unique security on the object depending on the values of one of its index fields, click the Security by Type tab, and click the Type Field drop-down list.
Any index fields that are a List of Values appear in the drop-down list. -
Select a list of value field.
Each value for the selected field has a Configure Security link.

-
Click Configure Security next to a list value.
The Configure Security window appears, which works just like the Default Security tab. -
Make any desired modifications to the security, and click Save.
The security for that list value shows Customized.
You can always reset it to be the same as the security configured on the Default Security tab by clicking the new Reset to Default link that appears. -
Once you are finiched modifying the security for the custom object, click Save.