Classification Maintenance
The following sections describe the various activities that a application administrator role can perform.
Outline
Overview
Use the Classification Maintenance screen to do the following:
- Create and add document types to a classification.
- Modify security settings at the classification and document type level for organizations and users.
- Create custom index fields.
- Add index fields to a classification (these index fields can then appear in search results or can be used to narrow a search).
- Choose whether users and roles can add documents to a particular classification.
- Connect collections to classifications by adding index fields and security.
Click Administration > Document Classifications. The Classification Maintenance screen appears.
Classification Maintenance Screen

Right-click a classification to see the available options:
Right-Click Menu Options on Classification Maintenance Screen

- Add New Top Level lets you create a new Classification that will be added to the list on this screen.
- Add Child lets you create a new Classification that will be added underneath the selected Classification.
- Modify lets you edit the selected Classification.
- Move lets you select a new location for the selected Classification.
- Delete deletes the selected Classification from the system.
- Print creates a PDF of relevant information about the selected Classification such as security settings.
When you select one of the Add or Modify options, this opens the Add/Modify Classification window.
Add/Modify Classification Window

The Allow Users to Add checkboxes determine how the classification functions structurally. Some classifications are really more of a high-level organization folder, which users shouldn’t add documents to directly, but rather should add documents to the relevant child classification. Meanwhile, other classifications are exactly where documents should go.
The Document tab determines things about individual documents within the classification, while the Collection tab determines things about collections of documents.
- Use the Indexes tab to define which index fields should be associated with documents or collections in the classification.
- Use the Document Types tab to manage Document Types within the classification.
- Use the Security tab to determine who has access to do what within the classification.
- Use the Disposition tab to manage Record Policies for the classification.
- Use the Priority Search Fields tab to configure which fields the system should use for the top search bar when the classification is selected on the document search screen.
Classification Index Fields
To modify the index fields for a classification, go to the Classification Maintenance screen and right-click the desired classification, then click Modify. This opens the Add/Modify Classification window.
To modify which index fields are associated to particular documents within the classification - e.g., what a user fills out when they upload a new document - then open the Indexes tab under Document. To modify which index fields are associated with a collection within the classification - e.g., what a user fills out when they create a new collection - then open the Indexes tab under Collection.
Add/Modify Classification Window
Open and close the different sections on the Indexes tab by clicking on the black triangle by the heading.
The Standard Index Fields are the same for all classifications. You can toggle which ones are shown and/or required for the selected classification by clicking on the relevant checkboxes. You can select Additional Index Fields to add to the classification in the second section.
Modify Label/Snippet
You can also modify the labels or snippets for documents or collections in the classification. The label is the blue title that appears in search results which users click to open the document or collection. The snippet is the additional index fields that are displayed in the search results.
Label and Snippet in an Example Search

When you click Modify Label, the Modify Document for Classification Label window appears.
Modify Document for Classification Label Window

Click Add Field to select fields to add to the label, enter any punctuation (ex. - or ,), and click Save.
When you click Modify Snippet, the Edit Fields screen appears.
Edit Fields Screen
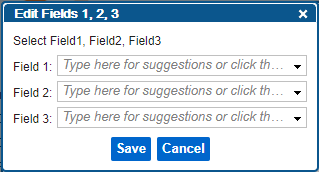
Select up to three index fields to display in the snippet in search results.
Modify Primary Field
The primary field on a Classification is a special index field that allows users to select multiple values, and tells the system to add a separate copy of the document for each selected value. Be sure to read all about primary fields to understand what they are before configuring one. Most Classifications probably don’t need one. Consider carefully whether a given field should be a primary field or simply a multi-value index field, which allows users to select multiple values and just adds a single copy of the document to the system.
To configure a primary field, click on the Modify Primary Field link. This opens a new pop-up window.

The drop-down menu on this window shows all of the single-value custom object fields on the Classification, as only those are eligible to become the primary field. If you don’t see the field you are looking for, you must first add it to the Classification and ensure that it is a custom object and configured as single-value. Fields that are not custom objects - such as text, date, LOV, etc - cannot be primary fields.
Select the field that should function as the primary field on the Classification, and click Save.
Classification Document Types
To modify document types for a classification, go to the Classification Maintenance screen and right-click the desired classification, then click Modify. This opens the Add/Modify Classification window.
Under the Document tab, click the Document Types tab. This displays the document types currently configured for this classification.
Add/Modify Classification Window - Document Type Tab

Add/Remove Document Types
You can easily remove a document type from the classification by clicking on the checkbox next to it and then clicking the Remove button. To add document types to the classification, click Modify. The Add Document Type window appears.
Add Document Type Window

The left pane shows all document types in the system that are not already added to the classification. You can search for document types by typing in the text box at the top of the pane, underneath Available Document Types. Click the checkbox next to any document type(s) you want to add to the classification, and then click Add in the middle of the screen.
You can also select document types on the right of the screen and click Remove to remove those document types from the classification. You can add a new document type to the system by clicking the Add New button. This opens the Add/Modify Document Type window.
Add/Modify Document Type Window

Enter the name for the new Document Type in the Type field, and then click Save to add the new Document type to the system and return to the Add Document Type window. Click Cancel on this screen to return to the Add Document Type window without creating any new Document Type in the system.
Back on the Add Document Type window, click Save when you are done, or click Cancel to return to the Add/Modify Classification window.
Customize Document Types
Back on the Add/Modify Classification window, you can modify settings for a specific document type within the classification by selecting the desired document type and then clicking Customize. The Document Type Customize window appears.
Document Type Customize Window

Here you can specify additional required fields for the selected document type, or modify security. Click Save to save your changes; Restore Defaults to return the required fields and security for the document type back to the same settings as the Classification, and Cancel to back out of the screen without making any changes.
Classification Security
To modify the security settings for a classification, go to the Classification Maintenance screen and right-click the desired classification, then click Modify. This opens the Add/Modify Classification window.
Click the Security tab to modify classification security.
Add/Modify Classification Window - Security Tab

Each line represents a unique group of users within the application, defined either by a static group or position, or by a user’s relationship to a particular index field on each document or collection within the classification. These entries are additive - if a user is in multiple different groups, they will get privileges from both groups.
It’s important to note that the application uses the Add privileges to determine which classifications a user can see when uploading a document, and View privileges to determine which classifications a user can see when performing a search. This helps cut down on noise for users in systems with huge classification structures, as they will only see classifications that are relevant to them. In the example above, all users can add documents to this classification (since Corporate HQ and {All Subgroups} has Add enabled), but only Application Administrators and Records Managers can view documents in this classification. Because of this, all users will be able to see the classification when adding documents to the system, but only Application Administrators and Records Managers will be able to search for documents in that classification.
That said, the application ignores Source Organization and Added By when determining these lists. Added By is the user who added the document, and Source Organization is determined by the Added By user’s Default Position. Both of these ACL entries are automatically included in every classification by default, and many have been configured with view settings that would interfere in how the application filters classifications for users. In practice, these ACL entries should likely be ignored in favor of more specific entries for each classification.
Additionally, if a classification has an index field based security entry, then all users in the system will be able to search for documents in that classification, since any user might be allowed to see specific documents within that classification.
Consider this example security setup for a Timesheet classification:
Example Timesheet Security Setup
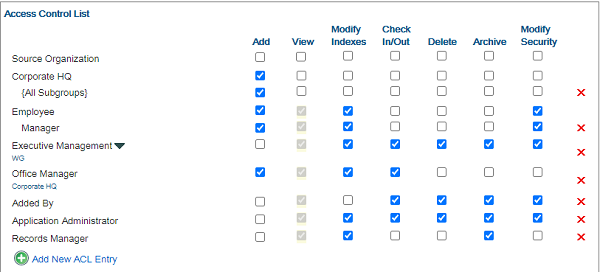
Employee is an index field on the Timesheet classification, and a given Timesheet is visible to the user who is assigned as the Employee, as well as that user’s Manager, regardless of who added it to the system. However, those users won’t be able to see any other Timesheets in the system unless they are also a member of the Executive Management, Office Manager, Application Administrator, or Records Manager groups. But, since any user could be added to a Timesheet as an Employee, all users in the system can see the Timesheet classification when searching for documents.